I was asked if I could do an article about designing appliques. I’ll just let you know a bit about how I started in the crochet business.
We started our crochet business about 18 months ago because my son Jason had to leave his job on a remote island in Northern Australia due to severe health problems. I design and test the patterns, record the videos and take photos for the website. Jason designed and manages the website, edits the videos, organises the marketing, edits the patterns and manages the technical side of the business.
Tips for Designing and Crocheting Appliques
- Use a smaller crochet hook than you would usually use for the yarn. It gives a tighter finish and looks better on appliques.
- I get ideas from many places but because I enjoyed cake decorating in the past some designs have come from cupcakes and simple colouring pages are also useful.
- Have a basic circle and oval pattern that can be used for most patterns.
- Try different stitches to see what works best for the design.
- Start with very simple designs and get more complicated designs as you grow in confidence.
- Jot down the pattern as you go, I use notes on my iPad as I find writing very difficult with my arthritis and the typing can easily be changed as the pattern is altered.
- Designing and checking the patterns takes a lot of time.
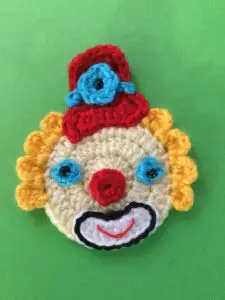
Designing the clown
- The first thing I did was make a sketch of the type of clown I wanted to design.

- I used my basic circle pattern for the head and decided how many rows I would need.
- I crocheted the hair next, tried a couple of different styles but decided on the wavy hair.
- For the clown’s nose I needed a fairly small circle so worked it in single crochet.
- The eyes needed to be smaller circles than the nose, so I worked less single crochet into my circle and I decided I’d stitch a bead in the middle of each eye.
- I wanted the mouth to bend upwards so worked either 2 or 3 double crochet into each stitch to give it the shape I wanted.
- I started the top hat at the top and kept the top part of the hat straight then worked the shaping for the brim. I worked a neatening row around the hat and decided it needed a band and flower to finish it off. I used chain for the band and stitched the flower to the hat with a bead.
- The last thing I did was embroider on eyebrows.