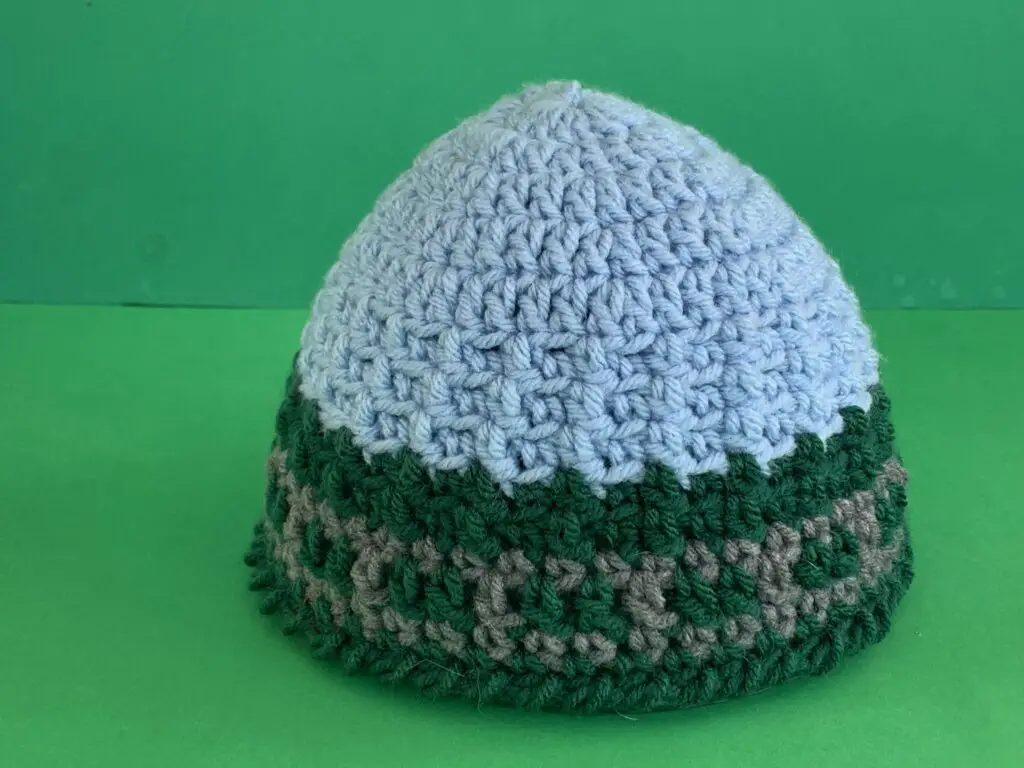
Welcome to my crochet train track beanie pattern. This is what the finished train track beanie will look like.
I make beanies for a charity group, and I designed this beanie to give to little boys. Next week I’ll give you some suggestions on decorating the beanies.
There’s also a video tutorial for this pattern available on my YouTube channel at crochet train track beanie tutorial.
To view this pattern for free, continue to scroll down this page. If you want to download the ad-free version, it’s available on my Ravelry store for $1 at crochet train track beanie pattern and on LoveCrafts at crochet train track beanie pattern.
This pattern will be using UK terminology. If you want to view the US version, go to crochet train track beanie pattern (US version).
Crochet Train Track Beanie Pattern
Abbreviations
- st – stitch
- sts – stitches
- ch – chain
- sl st – slip stitch
- dc – double crochet
- tr – treble crochet
Materials Used
- I used Blue, Green and Grey 10 ply yarn which is Worsted in the US and Aran in the UK.
- A crochet hook, I used a 5.5mm hook but I have tight tension.
- A darning needle to weave in ends.
- Scissors.
Size
To Fit Toddler 1-3 Years
Beanie circumference 46cm or 18”
Beanie length 18cm or 7”
After row 5
Beanie circumference 35.5cm or 14”
Beanie length 7.5cm or 3”
Gauge
9 stitches and 5 rows = 7.5 cm square or 3” square in tr.
To Make Beanie Bigger
Add another row of increases after row 5. 2 ch, work 1 tr in same st as join, 1 tr in each of next 4 sts, 2 tr in following st, (1 tr in each of next 5 sts, 2 tr in following st) repeat to end of row. Join with a sl st in top of 1st st.
If beanie needs to be longer, add a row 6 with green before rows 14 and 15.
Beanie
Using blue make a magic loop. You could work 4 chain and join with a sl st if you prefer.
Note: The chain at the beginning of each row doesn’t count as a stitch. You join in the top of the 1st stitch not the chain.
Row 1: 2 ch, work 16 tr in circle. Pull circle tight and join with a sl st in top of 1st st. (16 sts)
Row 2: 2 ch, work 1 tr in same st as join, 2 tr in next st, (1 tr in following st, 2 tr in next st) repeat to end of row. Join with a sl st in top of 1st st. (24 sts)
Row 3: 2 ch, work 1 tr in same st as join, 1 tr in next st, 2 tr in following st, (1 tr in each of next 2 sts, 2 tr in following st) repeat to end of row. Join with a sl st in top of 1st st. (32 sts)
Row 4: 2 ch, work 1 tr in same st as join, 1 tr in each of next 2 sts, 2 tr in following st, (1 tr in each of next 3 sts, 2 tr in following st) repeat to end of row. Join with a sl st in top of 1st st. (40 sts)
Row 5: 2 ch, work 1 tr in same st as join, 1 tr in each of next 3 sts, 2 tr in following st, (1 tr in each of next 4 sts, 2 tr in following st) repeat to end of row. Join with a sl st in top of 1st st. (48 sts)
Rows 6-8: 2 ch, work 1 tr in same st as join, 1 dc in back loop only of next st, (1 tr in next st, 1 dc in back loop only of following st) repeat to end of row. Join with a sl st in top of 1st st. (48 sts)
Change to green and fasten off the blue.
Row 9-10: 2 ch, work 1 tr in same st as join, 1 dc in back loop only of next st, (1 tr in next st, 1 dc in back loop only of following st) repeat to end of row. Join with a sl st in top of 1st st. (48 sts)
Change to grey but leave the green attached.
Row 11: 1 ch, work 1 dc same st as join, 1 dc in each st to end. Join with a sl st in top of 1st st. (48 sts)
Row 12: 2 ch, change to green and work 1 tr in same st as join and 1 tr in next to, change to grey and work 1 tr in following st, (change to green and work 1 tr in each of next 2 sts, change to grey and work 1 tr in following st) repeat to end of row. Join with a sl st in top of 1st st.
Row 13: Using grey work 1 ch, 1 dc in same st as join, 1 dc in each st to end. Join with a sl st in top of 1st st. Fasten off the grey and continue working with the green.
Row 14: 1 ch, work 1 dc in same st as join, 1 dc in each st to end. Join with a sl st in top of 1st st.
Row 15: 1 ch, work 1 reverse dc (crab stitch) in each st. Fasten off.
To Make Up
Weave in ends. Decorate the beanie if desired.
And there’s the finished train track beanie. I hope you’ve enjoyed the pattern. Next week I’ll be showing some ideas for decorating the beanie.
Have a look at some of my other patterns, including the crochet shawl, the baby blanket with centre panel and the wall hanging.

