
Welcome to my crochet teddy pattern. This is the second pattern of a series in making a plane mobile. This is the finished plane from last week.


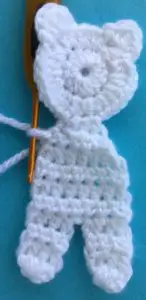
And this week I’ll be showing how to make the crochet teddy that will look like this.

There’s also a video tutorial for this pattern available on my YouTube channel at Crochet Teddy for Plane Mobile Tutorial.

To view the full pattern for free continue scrolling down this page. If you would like to download the pattern it’s available on my Ravelry store for $1 at Crochet Teddy for a Plane Mobile Pattern.
This pattern will be using US terminology. If you would like to view the UK version go to Crochet Teddy for a Plane Mobile Pattern (UK Version).
I would like to thank American Yarns who sponsored the posts for the plane mobile and provided me with the wool. American Yarns is an online store that ships to Australia and New Zealand, providing American yarn brands, such as Red Heart, Bernat and Caron, that are often difficult to find in Australia.


Crochet Teddy for Plane Mobile Pattern
Abbreviations
- st – stitch
- sts – stitches
- ch – chain
- sl st – slip stitch
- sc – single crochet
- hdc – half double crochet
- dc – double crochet
Materials Used
- I used White and a small amount of a different colour for the scarf of Red Heart Soft Yarn which is 8 ply wool, light worsted in the US and double knit in the UK.
- I used pink and black 4 ply crochet cotton for the inner ears and eyes, but you could embroider them on if you prefer.
- Crochet hooks, I used a 2.5mm hook and a 1.25mm crochet hook if using 4 ply crochet cotton for the inner ears and eyes.
- Scissors.
- Darning needle to weave in ends.
- Sewing thread and a sewing needle to stitch the inner ears and eyes to the teddy.
- Black and white embroidery cotton to embroider on the nose and mouth and a dot on the eyes.
- Filling to stuff the bear.
Head (Make 2 pieces down to the muzzle)
Make a magic loop.
Row 1: 1 ch, work 14 hdc into circle. Pull circle tight and join with a sl st in top of 1st st.
Row 2: 1 ch, work 1 hdc in same st as ch, work 2 hdc in each st to end. Join with a sl st in top of 1st st. Don’t fasten off.


1st Ear
1 ch, work 1 sc, 1 hdc and 1 dc in same st as ch, work 1 dc, 1 hdc and 1 sl st in next st. Fasten off.


Miss 4 sts and join yarn for 2nd ear.


Work 2nd ear the same as 1st ear.


Body
Join yarn to st before bottom middle st on head.


Row 1: 2 ch, work 1 hdc in same st as ch, 1 hdc in each of next 2 sts. Turn.
Row 2: 2 ch, 2 hdc in 1st st, 1 hdc in next st, 2 hdc in last st. Turn.
Row 3: 2 ch, 2 hdc in 1st st, 1 hdc in each st to last st, 2 hdc in last st. Turn.
Rows 4-6: 2 ch, 1 hdc in each st to end. Turn.


1st Leg
Row 1: 2 ch, 1 hdc in each of next 3 sts. Turn.
Rows 2-3: 2 ch, 1 hdc in each st. Turn.
Row 4: 2 ch, a hdc cluster over all sts. Fasten off.


2nd Leg
Miss 1 st and join yarn in the following st.


Row 1: 2 ch, work 1 hdc in same st as ch, 1 hdc in each of next 2 sts. Turn.
Rows 2-3: 2 ch, 1 hdc in each st. Turn.
Row 4: 2 ch, a hdc cluster over all sts. Fasten off.


Bear’s Right Arm
Join yarn at top of row 2 of body.

Row 1: 2 ch, work 1 hdc in each of next 2 sts. Turn.
Rows 2-3: 2 ch, work 1 hdc in each st. Turn.
Row 4: 2 ch, work a joined hdc over both sts. Fasten off.


Bear’s Left Arm
Join yarn to match with bottom of bear’s right arm.


Row 1: 2 ch, work 1 hdc in each of next 2 sts. Turn.
Rows 2-3: 2 ch, work 1 hdc in each st. Turn.
Row 4: 2 ch, work a joined hdc over both sts. Fasten off.


Muzzle
Make a magic loop.
1 ch, work 9 hdc in circle. Pull circle tight and join with a sl st in top of 1st st. Fasten off.


Scarf
42 ch.
Miss 2 ch and work 1 hdc in each st to end. Fasten off.


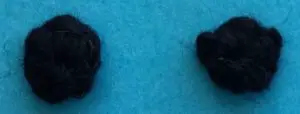
Eyes (Make 2)
Using black 4 ply crochet cotton make a magic loop.
1 ch, work 4 sc into circle. Pull circle tight and join with a sl st in top of 1st st. Fasten off.

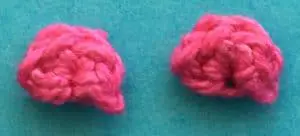
Inner Ears (Make 2)
Using pink 4 ply crochet cotton make a magic loop.
1 ch, work 4 sc into circle. Pull circle tight and fasten off. Don’t join.

To Make Up
Weave in ends. Embroider a mouth and nose on the muzzle.


Embroider a white dot on each eye.


Stitch the muzzle to the bottom middle of one of the heads.


Attach the eyes above the muzzle as shown.


Sew the inner ears to the bottom of the ears.


With wrong sides together and starting just under the arms stitch the 2 body pieces together, working around the arm and up around the head. Once you start on the 2nd arm put filling in the head then continue around the arm and down the body.


Put filling in each leg once you have stitched around it and put a small amount of filling in the body when you have a small gap left to stitch, then finish stitching the body together.


To make the body bend to sit in the plane, I work a row of stitching across the middle of the body through both body pieces.

And here’s the finished crochet teddy with a scarf.
I hope that you’ve enjoyed the pattern, be sure to come back next week and we’ll put it all together to make a plane mobile.
If you’ve liked the pattern you may also like this other teddy bear pattern that I’ve made.
