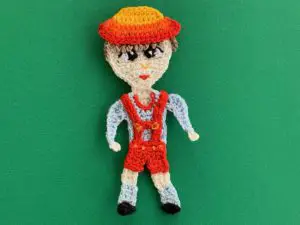
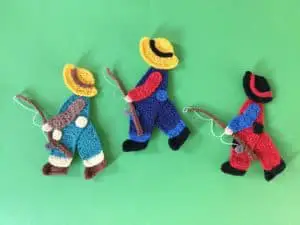
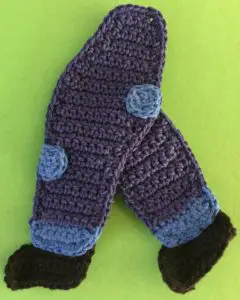
Today I’m going to be showing you how to crochet this boy with a fishing rod appliqué. The finished crochet boy will look like this.

There is also a video tutorial that you can follow along with at Crochet Boy with a Fishing Rod Tutorial.

This also makes a nice pair with the crochet girl that I designed.

If you would like to download the pattern it’s available for $1 on ravelry at Boy with a Fishing Rod Pattern or on LoveCrafts at Boy with a Fishing Rod Pattern.
This pattern will be using UK terminology. If you would like to go to the US version go to Crochet Boy with a Fishing Rod Pattern (US Version).
Boy with Fishing Rod Crochet Pattern UK
Abbreviations
- st – stitch
- sts – stitches
- ch – chain
- sl st – slip stitch
- dc – double crochet
- htr – half treble crochet
- tr – treble crochet
- dtr – double treble crochet
Materials Used
- A main and contrast colour of cotton or wool for the dungarees.
- Small amounts of cotton or wool for the hat, shoes, fishing rod, sleeve and hand.
- Crochet hook.
- Scissors.
- Thread and sewing needle to sew together.
- Darning needle to weave in ends.
Dungarees
Cuff
Using contrast colour for cuff if desired start with 8 ch. (You could work the dungarees in one colour).
Row 1: Miss 1st ch and work 1 dc in each st to end. Turn.
Row 2: 1 ch, 1 dc in each st to end.


Change to main colour


Rows 1-9: 1 ch, 1 dc in each st to end. Turn.
Row 10: 1 ch, 2 dc in 1st st, work 1 dc in each st to end. Turn.
Row 11: 1 ch, 1 dc in each st to end. Turn.
Row 12: 1 ch, 2 dc in 1st st, 1 dc in each st to end. Turn.
Row 13: 1 ch, 1 dc in each st to end. Turn.
Row 14: 1 ch, 2 dc in 1st st, 1 dc in each st to end. Turn.
Row 15: 1 ch, 1 dc in each st to end. Turn.
Row 16: 1 ch, 2 dc in 1st st, 1 dc in each st to end. Turn.
Row 17: 1 ch, 1 dc in each st to end. Turn.
Row 18: 2 ch, 1 htr in each of 1st 2 sts, 1 dc in each st to end. Turn.
Row 19: 1 ch, 1 dc in each st to end. Turn.
Row 20: 1 ch, 1 joined dc over 1st 2 sts, 1 dc in each st to last 2 sts, 1 joined dc over last 2 sts. Turn.
Row 21: 1 ch, I dc in each st to end. Turn.
Row 22: 1 ch, 1 dc in each st to last 2 sts, 1 joined htr over last 2 sts. Turn.
Row 23: 1 ch, 1 dc in each st to end. Turn.
Row 24: 1 ch, 1 dc in each st to last 2 sts, 1 joined dc over last 2 sts. Turn.
Row 25: 1 ch, 1 dc in each st to end. Turn.
Row 26: 1 ch, 1 dc in each st to last 2 sts, 1 joined dc over last 2 sts. Turn.
Row 27: 1 ch, 1 dc in each st to end. Turn.
Row 28: 1 ch, 1 joined dc over 1st 2 sts, 1 dc in each st to last 2 sts, 1 joined dc over last 2 sts.
Row 29: 1 ch, 1 dc in each st to end.


This is the right side up.
If using 1 colour for dungarees don’t fasten off, turn work over and work neatening row. If making a contrasting cuff fasten off.
Neatening Row
Work 1 ch then 1 dc in each st around to neaten using the cuff colour to work around the cuff and the main colour to work around the rest.


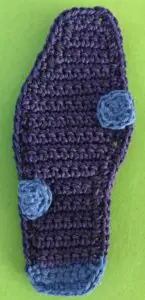
Back Leg
Cuff
Using contrast colour for cuff if desired start with 8 ch. (You could work the dungarees in one colour).
Row 1: Miss 1st ch and work 1 dc in each st to end. Turn.
Row 2: 1 ch, 1 dc in each st to end. Turn.
Change to main colour
Rows 1-5: 1 ch, 1 dc in each st to end. Turn.
Row 6: 2 ch, 1 htr in each of next 2 sts, 1 dc in each st to end. Turn.
Row 7: 1 ch, 1 dc in each st to end. Turn.
Row 8: 2 ch, 1 htr in each of next 2 sts, 1 dc in each st to end. Turn.
Row 9: 1 ch, 1 dc in each st to end. Turn.
Row 10: 2 ch, 1 htr in each of next 3 sts, 1 dc in each st to end. Turn.
Row 11: 1 ch, 1 dc in each st to end. Turn.
Row 12: 2 ch, 1 htr in each of next 4 sts, 1 dc in each st to end. Turn.
Row 13: 1 ch, 1 dc in each st to end. Turn.
Row 14: 1 ch, 1 dc in each st to end. If using 1 colour for dungarees don’t fasten off and work neatening row. If making a contrasting cuff fasten off.

Neatening Row
Work 1 ch then 1 dc in each st around to neaten using the cuff colour to work around the cuff and the main colour to work around the rest.


Sleeve
Make a magic loop.
Row 1: Work 2 ch and 2 htr in circle. Pull circle tight but don’t join. Turn.
Rows 2-5: 2 ch, 1 htr in each st. Turn.
Row 6: 2 ch, 2 htr in same place as ch, joined htr over same st and last st. Turn.
Row 7: 2 ch, a joined htr over 1st 2 sts, 2 htr in same st as last part of joined htr. Turn.
Row 8: 2 ch, 2 htr in same place as ch, joined htr over same st and last st. Turn.
Row 9: 2 ch, a joined htr over 1st 2 sts, 2 htr in same st as last part of joined htr. Turn but don’t fasten off.


Neatening Row
1 ch, work 1 dc in each st around sleeve, working a joined dc into the bend of the arm and extra dc at the elbow to help it bend. Fasten off.


Hand
Make a magic loop.
4 ch, 3 dtr cluster into circle. Pull circle tight and fasten off.


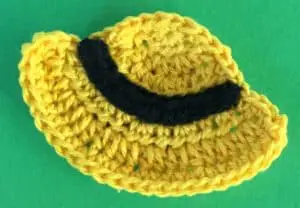
Hat
Make a magic loop.
Row 1: Into circle work 2 ch and 4 htr. Pull circle tight but don’t join. Turn.
Row 2: 2 ch, 1 htr in same place as ch, 2 htr in each of remaining sts. Turn.
Row 3: 2 ch, 1 htr in same place as ch, 1 htr in each of next 2 sts, 2 htr in following st, 1 htr in each of next 2 sts and 2 htr in last st. Turn.
Row 4: 2 ch, 1 htr in same place as ch, 1 htr in each st across. Turn.
Row 5: 2 ch, 2 htr in same place as ch, (1 htr in next st and 2 htr in following st) repeat across to last st, work 3 htr in last st. Turn.
Row 6: 2 ch, 2 htr in same place as ch, (1 htr in next st and 2 htr in following st) repeat across to last st, work 3 htr in last st. Don’t fasten off.


Neatening Row
1 ch work 1 dc in each st around the hat. Join with a sl st in ch. Fasten off.


Trim for Hat
Make enough ch to fit just above brim of hat. Work 1 dc in each st if you want a thicker trim. Fasten off.


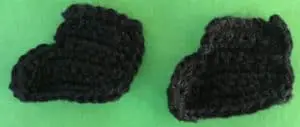
Shoes (Make 2)
7 ch.
Row 1: Miss 1st ch, work 1 dc in each st to end. Turn.
Rows 2-3: 1 ch, 1 dc in each st to end. Turn.
Row 4: 1 ch, 1 dc in each st to end. Work 3 ch. Turn.
Row 5: Miss 1st ch, work 1 dc in each of remaining 2 ch, and 1 dc into each st to end. Turn.
Row 6: 1 ch, work 1 dc in each st to last st, work 2 dc in last st. Turn.
Row 7: 1 ch, work 1 dc in each st to end. Fasten off.


Neatening Row


Join cotton to instep (as shown) and work 1 dc in each st around bottom and side finishing at top. Fasten off.

Patches (Make 2)
3 ch.
Row 1: Miss 1st ch and work 1 dc in remaining 2 ch. Turn.
Row 2: 1 ch, work 1 dc in each st. Don’t fasten off.
Neatening Row
1 ch, work 1 dc in each st and 2 dc into each corner st around patch. Fasten off.


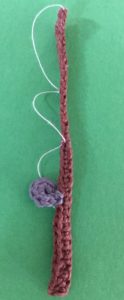
Fishing Rod
40 ch.
Miss 1st ch, work 1 sl st in each of next 15 sts, 1 dc in each of following 10 sts, 1 htr in each st to end. Fasten off.


Reel
Make a magic loop.
1 ch, work 7 dc into circle. Join with a sl st in ch.


Attach to the rod with a sl st about 8 sts up from the bottom on the thick end. Fasten off.


To Make Up
Weave in ends. Attach the 2 patches to the main part of the dungarees.

Stitch the trim to the hat.

Sew the back leg to the dungarees.


Attach a shoe to each leg.
Stitch the hand to the bottom of the sleeve.


Stitch the sleeve to the body.


Sew the hat to the top of the dungarees.


Attach fishing line to the fishing rod if desired.

Sew the fishing rod under the hand and secure it to the boy if desired.

Here’s the finished boy with the crochet cow that I made last week.

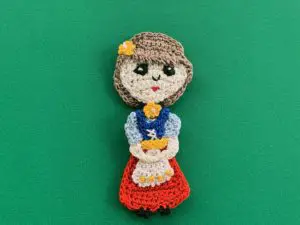
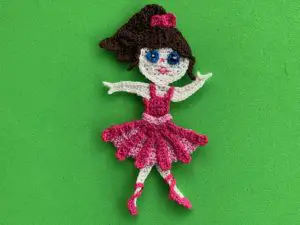
If you’ve liked the pattern, have a look at some of my other patterns including the crochet Bavarian boy, crochet Bavarian girl pattern, crochet girl with a basket of flowers, crochet ballerina and crochet girl.